 the chain length. Ch. 3 and turn Repeat for ROW 2 at end of row 2 ch.4 turn
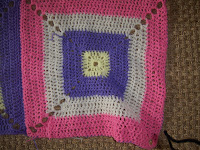
 With other color...Start in a Corner, with a Slip Stitch. Ch.3 then 6 TC in Corner Opening. then 2 DC, then 6 Tripple all the way around the Blanket....this will make your border! with the ripple effect.

In my search to find a Lap Blanket Pattern, I Found out you can use a baby blanket pattern and just use adult colors, I also ran across this,
Lion Brand® Babysoft®
GAUGE:
1 Square = 9 3/4 in. (25 cm) in pattern stitch. BE SURE TO CHECK YOUR GAUGE. When you match the gauge in a pattern, your project will be the size specified in the pattern and the materials specified in the pattern will be sufficient. If it takes you fewer stitches and rows to make a 4 in. [10 cm] square, try using a smaller size hook or needles; if more stitches and rows, try a larger size hook or needles.
COLORWAYS
Colorway 1: Work first 2 rnds with A, 3 rnds with B, 3 rnds with C, 3 rnds with D.
Colorway 2: Work first 2 rnds with D, 3 rnds with A, 3 rnds with B, 3 rnds with C.
Colorway 3: Work first 2 rnds with C, 3 rnds with D, 3 rnds with A, 3 rnds with B.
Colorway 4: Work first 2 rnds with B, 3 rnds with C, 3 rnds with D, 3 rnds with A.
SQUARE (make 12 total - 4 each in Colorways 1 and 3; 2 each in Colorways 2 and 4)
With first color, ch 4; join with sl st in first ch to form ring.
Rnd 1: Ch 3 (counts as first dc here and throughout), work 15 dc in ring; join with sl st in top of beg ch - 16 dc.
Rnd 2: Ch 3, 4 dc in same st as join (corner made), *dc in next 3 dc, 5 dc in next dc (corner made); rep from * around to last 3 dc, dc in last 3 dc; join with sl st in top of beg ch. Fasten off.
Rnd 3: Join next color to center dc of any 5-dc corner, ch 3, 4 dc in same dc (corner made), *dc in next 7 dc, 5 dc in next dc (corner made); rep from * around to last 7 dc, dc in last 7 dc; join with sl st in top of beg ch.
Rnd 4: Sl st in each st to center dc of 5-dc corner, ch 3, (dc, ch 2, 2 dc) in center dc (corner made), *dc in next 11 dc, (2 dc, ch 2, 2 dc) in next dc (corner made); rep from * around to last 11 dc, dc in last 11 dc; join with sl st in top of beg ch.
Rnd 5: Sl st in each st to corner ch-2 sp, ch 3, (dc, ch 2, 2 dc) in ch-2 sp (corner made), *dc in next 15 dc, (2 dc, ch 2, 2 dc) in next ch-2 sp (corner made); rep from * around to last 15 dc, dc in last 15 dc; join with sl st in top of beg ch. Fasten off.
Rnd 6: Join next color in any corner ch-2 sp, ch 3, (dc, ch 4, 2 dc) in same ch-2 sp (corner made), *dc in next 19 dc, (2 dc, ch 4, 2 dc) in next ch-2 sp (corner made); rep from * around to last 19 dc, dc in last 19 dc; join with sl st in top of beg ch.
Rnds 7 and 8: Sl st in each st to corner ch-4 sp, ch 3, (dc, ch 4, 2 dc) in ch-4 sp (corner made), *dc in each dc to next corner ch-4 sp, (2 dc, ch 4, 2 dc) in corner ch-4 sp (corner made); rep from * 2 more times, dc in each dc around; join with sl st in top of beg ch.
Fasten off.
Rnd 9: Join next color in any corner ch-4 sp, ch 3, (dc, ch 4, 2 dc) in ch-4 sp (corner made), *dc in each dc to next corner ch-4 sp, (2 dc, ch 4, 2 dc) in corner ch-4 sp (corner made); rep from * 2 more times, dc in each dc around; join with sl st in top of beg ch.
Rnd 10: Ch 1, *5 sc in next ch-4 sp, sc in each dc to next ch-4 sp; rep from * around; join with sl st in first sc.
Rnd 11: Ch 1, *sc in each sc to center sc of 5-sc corner, 3 sc in center sc, sc in each sc to next corner; rep from * around; join with sl st in first sc.
Fasten off.
FINISHING
Following assembly diagram, sew Squares together. Weave in ends.
Square #1 Square #2 Square #3
Square #3 Square #4 Square #1
Square #1 Square #2 Square #3
Square #3 Square #4 Square #1
ABBREVIATIONS / REFERENCES
Click for explanation and illustration
beg = begin(s)(ning) ch(s) = chain(s)
ch-space = space previously made dc = double crochet
rep = repeat(s)(ing) rnd(s) = round(s)
sc = single crochet sl st = slip stitch
sp(s) = space(s) st(s) = stitch(es)
If you would rather order one instead of make one, go to Lion's Brand for only $19.95


